Preparation
Before you get started, you must have a Rosterfy account and a Blackbaud NXT license.
Find Rosterfy In Blackbaud App Marketplace
The first step is to connect the Rosterfy app in the Blackbaud Marketplace to your Blackbaud Account. You can find our app on Blackbaud Marketplace here. When you hit the 'connect' button, Rosterfy's 'add in' is installed in your NXT account on the constituent page
Enable Integration From Rosterfy
- In your Rosterfy account, navigate to the 'Integrations' section of your admin console. You should find an option for 'Blackbaud' in the list of available Integrations

- On the application setup screen you will see an 'authorize' button the first time you launch the integration.

When you click the authorize button, you will be prompted in a popup window to allow Rosterfy to perform actions on your behalf. The specific permissions needed will be listed for you.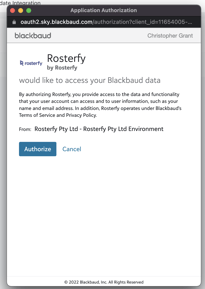
- Once authorized, Rosterfy will perform the following API calls to complete its setup
- Setup 3 custom field categories on your NXT account. These fields are 'Total Volunteer Hours', 'Total Volunteer Shifts' and 'Total Volunteer Events'. These are updated daily with values for your volunteers
- Add 3 webhooks to your account, so that when any constituent is added, updated or deleted, Rosterfy is told so we can update the constituent on our end. Note, we only update those constituents that have the constituent code 'Volunteer'
- Rosterfy will perform a series of checks to ensure the constituent data types required are available. If a type is not available you will receive a warning and will need to add to your blackbaud account. The 3 types required are
- Phone Types - Mobile
- Address Type - Home
- Email Address Type - Email
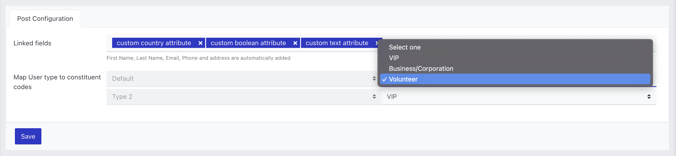
- After the integration is authorized and setup is complete, you do have some options to configure on the Rosterfy side. You can choose which attributes should be syncronized with Blackbaud. Please note, if you choose custom fields that you have configured on Rosterfy, the name of the attribute must match EXACTLY the name of the custom field in Blackbaud. If this is not the case, these fields will not syncronize. You can also choose which Rosterfy user types are linked to which constituent codes in Blackbaud. This allows multiple user types to be syncronized across systems
Finalize Blackbaud Setup
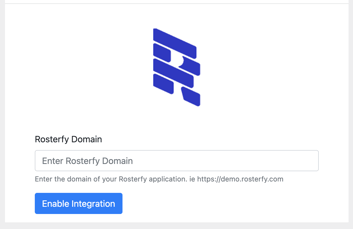
The last step is to configure your add-in for Blackbaud. The first time you load the constituent page after enabling the marketplace app, you will be prompted to add your Rosterfy URL. This is the domain of your Rosterfy account. It will be something close to *.rosterfy.com or *.rosterfy.co. If you have an enterprise Rosterfy account, it may be a subdomain of your own domain. Once you have added the subdomain, Rosterfy will load the information about a constituent in the 'add-in'. If you are not logged into your Rosterfy account, the add-in will not load